![[Top bar]](../../common/images/Topbar-en.gif)
![[Bottom bar]](../../common/images/Bottombar-en.gif)
![[Yves Ceccone]](../../common/images/Yves-Ceccone.jpg)
by Yves Ceccone
About the author:
Was a photographer, changed to infographics, and never dropped
the mouse since.
Content:
|
Gimp's tools: selection and color correction
![[Illustration]](../../common/images/illustration99.gif)
Abstract:
The Gimp is a very powerful program to create and
manipulate images. Some of its many tools allow you to make
selections, and that's what this article is about. A selection is
used to isolate a specific part of the image in order to change it,
independent of the rest of the image. You can copy, move, replace
or filter a selection, and you can also change its
colors/contrast/brightness or even apply an effect to it. The list
of possibilities is endless.
When we speak of color corrections, it's important to be careful
with the corrections you do. If you want a natural looking result
(depending on your personal taste, of course), a nice correction
should stay invisible.
This article describes Gimp's selection tools and the different
ways you can handle selections, and also gives a small introduction
to some color correction tools.
This toolbar shows Gimp 1.0.4, a stable version. But I
would surely recommend you to install a recent developer's version,
because of the new features it has. For example Gimp 1.1.9 gave no
problems (on my redHat 6.0), it contained 6 extra tools, extra
features for the feather tool, a new navigation system for when
you're zooming, ...
The rectangular and the elliptic/circular selection
tools.
These two tools are easy to use, and with a doubleclick on the
icon you can alter some of their options (e.g. curved corners.) For
a perfectly round selection, you take the elliptic tool and simply
keep pressing the "shift" key while selecting.
The lasso, for selecting a zone you draw by hand. Options
are anti-aliasing and soften
The fuzzy selection tool, to select a continuous region.
This tool is only precise when the zones to be selected are uniform
shapes, and it could be handy to make a rough selection with the
help of the "shift" and "ctrl" keys. The
rough selection can then be refined with other tools.
The feather tool, uses bézier curves to define your
selection. It takes some time before you know how to use this tool
correctly. It can be used to get the contour of an object very
precisely with a path and then turn this path (or trace) into a
selection. You can save a path and you can also turn an existing
selection into a path.
Intelligent scissors, starting from a hand drawn selection,
this tool "guesses" the zone you wish to select. A difficult tool
to use, and it seems to have changed in the 1.1.9 version: it is
now "magnetic" it sticks to the shapes you want to select
Selection "by color", with this one you can make selections
based on the color value, and thus you can substract, add or
replace the colors you selected.
And finally a fabulous tool: Mask mode, first spotted in
v1.1.8 (an internationalised version!). When a selection is in mask
mode, you can change its shape with the brush, the pencil (or the
airbrush). With either white or black as painting color, you can
freely retouch your selection very efficiently. To make it
complete, you can use different tools on the same selection (e.g.
the pencil (neat) and then the brush with a soft setting) so you
can for example select an object along with it's shadow ...
Some common rules for tools and selections
- With the comand "ctrl + i" (or with the menu
selection -> invert) you can invert a selection.
- You can make a selection invisible while keeping it active,
very practical because you won't be distracted by the dotted line
and you can concentrate on the retouch. Use the command
"ctrl+t"
- You can shrink a selection: hold down ctrl and
define the section you want to remove with any of the drawing
tools. The defined section will be removed from the original
selection
- Much in the same way, you can add to a selection by holding
down the "shift". (both of these work with the fuzzy
selection tool)
- You can "unselect" everyting with the command "ctrl +
shift + a".
- You can move a selection with the "alt" key pressed,
otherwise you cut the picture.
- You can modify a selection, enlarge it, reduce it, soften it,
refine it...
- You can save a certain selection in the panel
"channels". This is necessary to go back to a certain
correction without doing all the selection work all over... It's
very practical when you're adding or subsracting selections.
- In Gimp you can change you keyboard shortcuts. In this article
we used the defaults...
Small exercises
Before we start to work with the selection tools, let's perform
some basic exercises. Create a new image, the size doesn't really
matter.
Fill the image (use the fill tool after choosing a
"foreground color" by double-clicking on it) with a color, and make
a selection in the top left corner of the image with the
rectangular tool (on the top row, left).
With the move tool,  move the selection. You can now see the background,
so we have just cut out a part of our image.
move the selection. You can now see the background,
so we have just cut out a part of our image.
Press "ctrl+z" to undo this action, and move the
selection again, but this time with the "alt" key held
down. There is no cutting this time, we just have moved the
selection itself.
When you select a new part of the image, your previous selection
disappears.
You kan keep the first selection by holding down "shift"
(in the recent versions a "+" now appears next to the cursor), in
order to select both rectangles.
In the same way, you can add a circle, an ellipse, or any other
shape to the selection.

To substract one selection from the other, you use the same tools
in combination with "ctrl".
Now, make a complex looking selection and fill it with another
color.
There are now two colors in the image. When you click on one of the
colors with the fuzzy selection tool,  the complete area of the image with that color is
selected. When you do "ctrl+i", the selection is
inverted; you can check the result of that with "ctrl+k"
(delete)...
the complete area of the image with that color is
selected. When you do "ctrl+i", the selection is
inverted; you can check the result of that with "ctrl+k"
(delete)...


Now it's time to start working with color selections: in the menu,
right click select -> by color, and then all you have
to do is to pick the desired color in your picture.
The drawing pen
The drawing pen is the base tool for programs like killustrator,
sketch ... (illustrator, freehand) but here we use it to help us
make a selection. It can be very misleading when you use it for the
first time, especially when you need to draw precise curves. It
might be best to forget this tool at first and try to use it later,
particularly with Gimp 1.0.4. Version 1.1.9 and above have means to
deal with drawings in an easier manner.
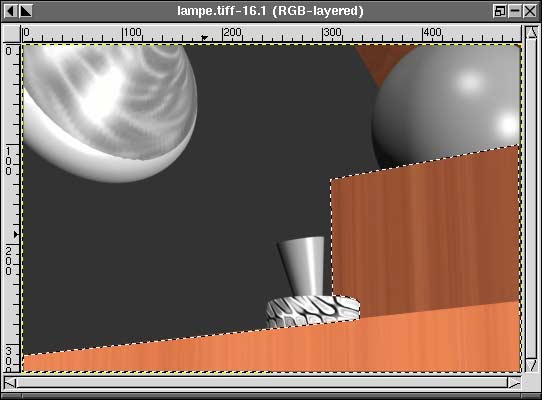
The hard part of this drawing is the slight curve in the middle of
the image. These three steps show the principle of a curve using
the drawing pen and Bezier curves; no problems for math addicts
juggling with tangents... As far as others are concerned (I am
among them), they need to understand the principle and just
practice a bit.
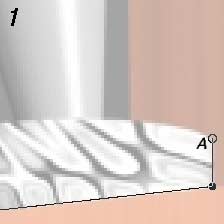
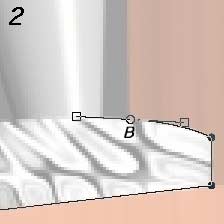
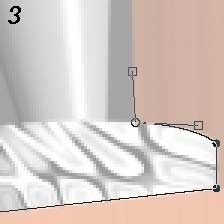
In order to get picture 1 (at point A), one just need to click
from point to point until picture 2 is reached. Then, after placing
point B, pull left without releasing the mouse button. This creates
a curve and its tangents; once the curve fits the object release
the mouse button. Next, bring the left tangent in the direction to
follow in order to carry on the drawing and clicking on the small
square. Holding down "shift", only the left tangent
moves. It must be placed vertically, toward the next point... When
the loop ends, the drawing is selected by clicking inside it.
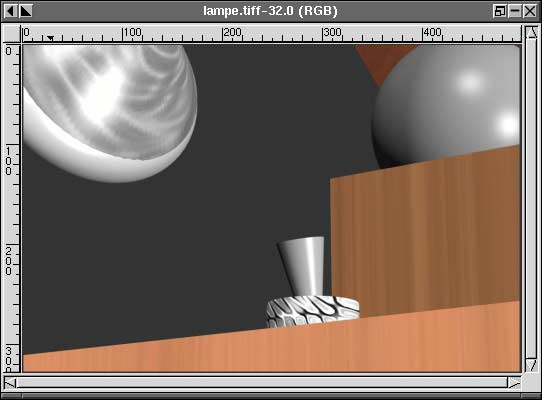
Once selected, you can modify the color. Here I have simply slided
the cyan/red cursor of the "color balance" menu (" right click
-> Image -> Colors -> Color Balance") toward cyan in
order to remove the warm prevailing color of wood. In this menu, it
is possible to choose the range of tones to modify: clear, average,
dark...
Principle about work on colors:
1-- red---cyan
2-- green---magenta
3-- blue---yellow
Left we find the primary colors anf right the secondary.
more green is equivalent to less magenta
more blue is equivalent to less yellow...
One can make the image red by sliding cursor 1 toward red (so less
cyan)
But it is also possible to get a red color by sliding cursors 2 and
3 toward cyan and magenta of the same amount. In order to have an
orange-red color, one will have to add in more yellow than magenta.
For a colder red, add more magenta than yellow...
Similarly, yellow is obtained with red and green.
To perform such tests, use a uniform gray background.
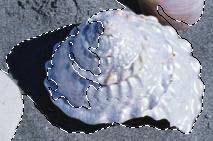
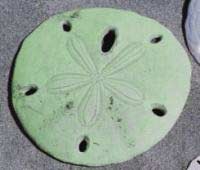
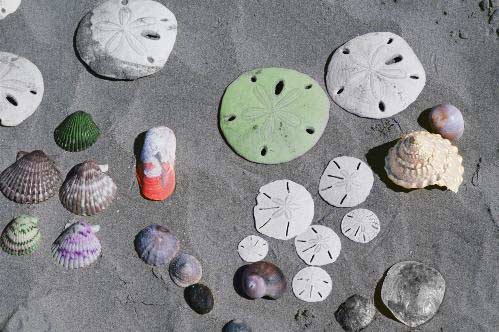
Fuzzy and hand selection (hot sand)

Here is what can be obtained using the fuzzy selection tool; with
one click on the sand we can change its color without changing that
of the shells. Of course, it is necessary to tweak and modify
parameters for the tools each time (parameters can be altered using
the double-click on a tool).
This magic wand trick has nicely eased the work and the
selection can be finished with the hand selection tool (looks like
a lasso) using the "ctrl" key in order to remove places
we do not need in the selection:
After such a selection, it is wise to save the work in one channel
with (active selection): "right click -> Selection ->
Save To Channel".
We now have one more channel under the channels tag ("Layers
-> Layers & Channels"). Choose this channel and
click on "channel to selection", this will activate this
selection.
Be careful, to modify the picture after this manipulation, you need
to go back to the channels tag and click on the channel to
modify.
To save an image with one or more layers added, you must use the
native Gimp file format (.xcf) otherwise everything could be lost.
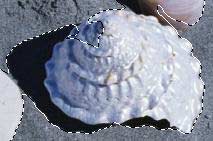
As soon as the sand has been selected, we can use yet an other
tool to modify the sand main color and give it a warmer
feeling:
Levels ("Image -> Colors -> Levels")
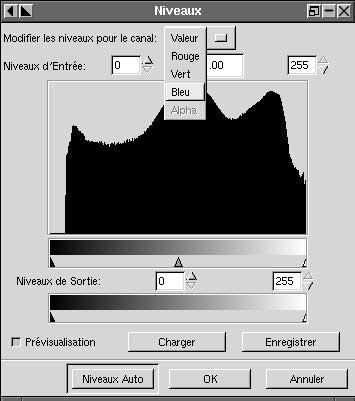
The drop down menu from the window "Levels" allows us to choose
either "value" which corrects density and global contrast, or any
color in order to act only on that color.
This "Levels" dialog box allows finer tuning than "Color Balance".
The 2 extreme cursors modify image contrast and the central one
modifies the average levels. The output level cursors also modify
contrast but in a different way, and so on...
A "curve" dialog box also exists and has the same
possibilities as "Levels" but allows more corrections on zones with
a particular color.
Modifications of blue and red colors must be done to correct the
cold aspect of our sand. Check the preview checkbox and watch the
result of the correction.
To select a shell (of which we want to change the color), we can
use the sand selection (recorded in a channel). It can be activated
and then inverted so that one selection will hold all the shells.
To select only one, use the lasso with the "ctrl" key down and
suppress from selection the things we do not want.
To modify colors, there also is the "hue saturation" tool
("Image -> Colors -> Hue-Saturation"). You can click the Master
button or select a single color.
The upper cursor is used to replace the selected
color.
The second cursor deals with light density.
The third one is for saturation; sliding fully the cursor to the
left yields a black and white picture (equivalent to the command
"Image -> Colors -> Desaturation").
"ctrl+T" on the selected shell makes the selection invisible, which
is easier to work with.
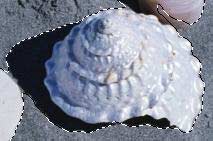
 Example of the use of the hue cursor
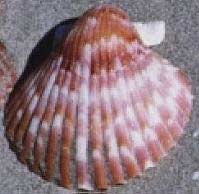
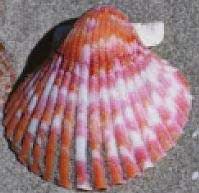
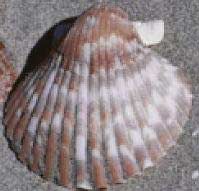
Here, the first image is the original one. On the second one I used
the saturation (+) command with red and on the third one I used
saturation (-) with the same colors.
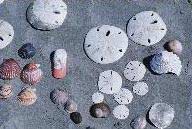
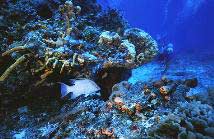
Here is the modified image, with a warmer sand and a few
modifications on the shells colors (the original on the right):
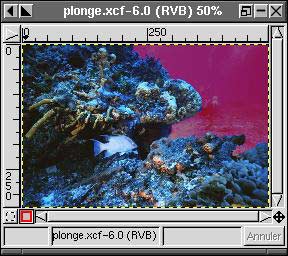
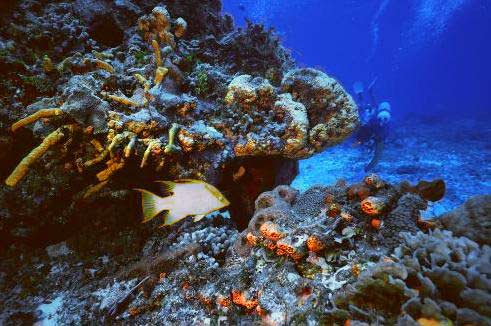
The masking tool and lasso (diving)
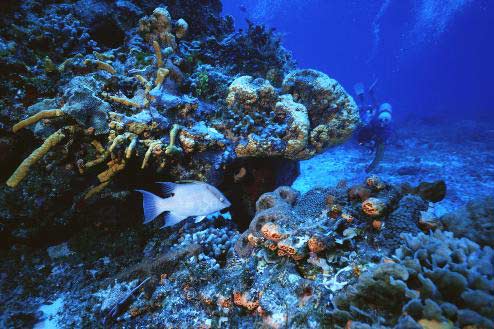
This dominating color in this image is blue/cyan . It is possible
to improve it by modifying 2 zones: mainly the stuff in the
foreground, and then the fish it selves which is part of the
foreground.
In order to be able to use the mask tool, I use version 1.1.9 of
Gimp here (unstable at the time of writing) [I noticed a problem
with the jpeg saved format]. I repeat here that this version is
really easy to install (on a Red Hat 6.0). The mask tool is also
available with version 1.1.8 ...
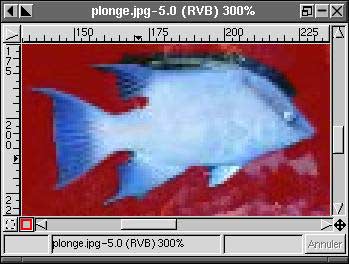
With the lasso, one needs to cut around the fish, even roughly, and
then click on the little red square in the lower left of the
window.
The image is now covered with a red shade except for the selected
fish.
To improve the selection so that the red mask perfectly surrounds
the fish, you have to use the brush (because it allows both hard
and soft pressure).
 When the color selector is set like this (black
in the foreground, white behind), red is added. To remove some red,
the "x" key is pressed so that the white goes in the foreground
instead of red. So if we have slipped with the red brush on the
fish or removed too much of the mask, it's easy to correct...
When the color selector is set like this (black
in the foreground, white behind), red is added. To remove some red,
the "x" key is pressed so that the white goes in the foreground
instead of red. So if we have slipped with the red brush on the
fish or removed too much of the mask, it's easy to correct...
Of course, the size of the brush must be choosen adequatly in order
to be able to control the drawing. After a few tries, choose the
"softness" of the tool according to the focus of the object.
You can modify the color of the mask (standard set at red, as said
before) and its opacity with a double click on the red square. So
when your image makes it difficult to work with the standard red
mask, you can change the mask's color at will.
When the mask is finished, we go back to normal mode by clicking
the small square that represent the selection (it's left of the red
one).
We then save our selection in a channel.
Next we select the foreground using the same method.
We save this selection (just like we did with the last one).
This is how to adjust the foregroud without altering the fish:
On the "channel" tag of the dialog window "layers and channels",
choose the mask of the selection of the foreground (its shape is
easily recognised), then click on the icon, showing a dotted circle,
at the bottom of the toolbar. The selected foreground appears on
the image.
Next, choose the mask of the fish and press the "ctrl" key when you
click on the icon with the dotted circle. This will substract the
fish from the foreground.
Now for color corrections:
Go back to the layers tag and select the layer. Then use levels to
add red and yellow to the foreground. Next increase the red and
yellow saturation with "hue/saturation"
Do the same on the fish, only a bit stronger and add more contrast
and brightness:
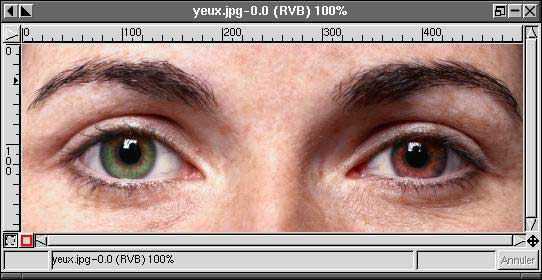
Fuzzy edges mask (eyes)
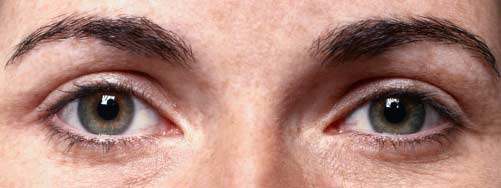
To change the color of the eyes in this image, it is necessary to
use a fuzzy edge selection because there are no precise limits to
the various elements an eye contains.
A fuzzy selection can be obtained using the feather (select ->
feather) or by using a selection tool with a "soften edge" option.
But it is difficult to control the effects of what you do,
especially before version 1.1.8.
Finally there is the mask tool solution:
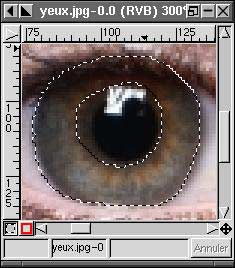
Make a first selection around the circular object using the lasso.
Still using the lasso, remove the black part of the selection by
holding down the "ctrl" key.
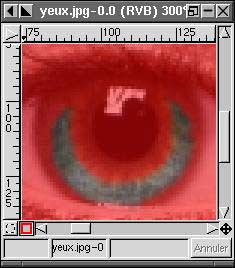
You can check the exact extent of the selection when you switch to
mask mode. You can refine it with the brush using a soft shape (or
with the airbrush) together with the color selector set to black
and white. Use the "x" key to switch from one to the other. It is
important to remove all black or dark zones from the selection and
to set the fuzzy limit so that the retouch is credible. With this
system of masks, it is very easy to test the masks. "ctrl + z" is
your best friend to undo little tests, and you can modify the mask
at any time.
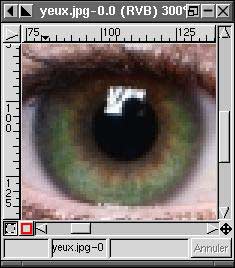
Here I used the levels (input): middle slide bar (green) towards
left and the left one slightly towards right. Next with the
saturation command a bit more saturation for green and
yellow.<<!--? -->
Tweaking...
That's it. I hope this article can help you to discover the merits
of the superb tool that GIMP is. I hope you now cannot wait to
tweak the colors of you photos...
Some links:
- On the site of Gimp you can
read the GIMP Users Manual: "GUM", in PDF or in HTML format.
- A paper version of this "GUM" is also available in
bookshops.
- Another book, "The artist's Guide to Gimp", a
publication of MCD2.
- LinuxArtist.org :
Resources for Linux-using artists : Links to tutorials,
applications, news, galeries ...
Talkback form for this article
Every article has its own talkback page. On this page you can submit a comment or look at comments from other readers:
2001-01-27, generated by lfparser version 2.8