|
|
|
| This document is available in: English Castellano Deutsch Francais Nederlands Turkce |

by Sebastian Bauer <sebastian.baua(at)t-online.de> About the author: At the beginnig of my time at university I unintentionally "crashed" head on into Linux. Since then I learned quite a bit and like the freedom and the possibilities one has with Linux and open source. You can visit my homepage at www.goblin.kicks-ass.org Translated to English by: Sebastian Bauer <sebastian.baua(at)t-online.de> Content: |
An ISDN - Fax with Linux
Abstract:
In this article I will describe how to use your linux box as an ISDN fax
machine with an ISDN card from AVM and the hylafax suite.
|
You don't need much software to use linux for sending faxes over ISDN.
I will restrict this article to passive cards from AVM because have only seen capi drivers for Linux for those passiv cards. Besides those cards any active card should work, but I could not test this because I can not afford these (for any hardware charity please contact me). I will compile every program used in this article from source to ensure that this tutorial works for as many Linux distributions as possible. I have tested it with a FritzCard PCI and a ISDN Adaptor Classic (ISA) with SuSE 8.1 and Redhat 8.0 (it worked with these). Unfortunately I cannot guarantee that it works in other configurations.
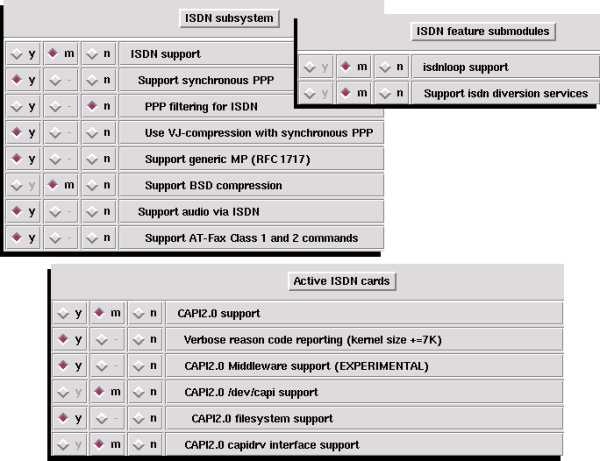
For the next steps you MUST have a kernel with capi support, so you should first compile a new kernel. You will find information about compiling a kernel at The Linux Documentation Project e.g. in the kernel HowTo. Many distributions do not include capi support in their kernel or do not use the standard sources, so get the standard kernel source code at www.kernel.org. Besides the kernel settings you need for your hardware you will have to enable the following ISDN specific options:
After that you can compile the kernel as usual with
make dep
make bzImage
make modules
make modules_install
After that you have to reboot on the new kernel. Now you can go on with the installation of capi4linux.
Officially, the capi4linux device drivers from AVM are only available for SuSE Linux, but you can use them with every other distribution (kernel) you like. First you should download the drivers for your card at www.avm.de. Make sure to get the right drivers for your card. The version of SuSE is almost irrelevant, but it should at least use the same major release version of gcc as you do. Now you can unpack the archive with
tar xfz fcpci-suseX.X-XX.XX.XX.tar.gz
or
tar xfz fcclassic-suseX.X-XX.XX.XX.tar.gz
respectively. Then you can compile the file src.drv/fcpci.o or src.drv/fcclassic.o with
make
in the directory fritz. This file has then to be copied to /lib/modules/2.4.XX/kernel/drivers/isdn/avmb1/. Afterwards you have to do a
depmod
to get the system dependencies right. The error message Unresolved symbols in /lib/modules/2.4.XX/kernel/drivers/isdn/avmb1/fcpci.o that will surely appear can be ignored. To complete the configuration of your ISDN card you have to create the file /etc/capi.conf. The example file from AVM looks like this:
# card      file    proto  io     irq  mem  cardnr  options
#b1isa      b1.t4   DSS1   0x150  7    -    -       P2P
#b1pci      b1.t4   DSS1   -      -    -    -
#c4         c4.bin  DSS1   -      -    -    -
#c4         -       DSS1   -      -    -    -
#c4         -       DSS1   -      -    -    -       P2P
#c4         -       DSS1   -      -    -    -       P2P
#t1isa      t1.t4   DSS1   0x340  9    -    0
#t1pci      t1.t4   DSS1   -      -    -    -
#fcpci      -       -      -      -    -    -
#fcclassic  -       -      0x300  5    -    -
Here you have to uncomment the entry for your card. If you use the fcclassic line you probably have to edit it, to match your hardware settings.
The capi4k-utils provide some useful tools for the capi interface. To install them you have to get the source code file capi4k-utils-XXXX-XX-XX.tar.gz here and then unpack it with
tar xfz capi4k-utils-XXXX-XX-XX.tar.gz
Now you can compile and install the capi4k-utils with
cd capi4k-utils
make menuconfig
make
make install
You can leave the options at make menuconfig as they are if you are in doubt, but you have to make sure that your changes are consisent with the other settings made later. Now you should add or change the following entries in /etc/modules.conf
alias char-major-43 capidrv
alias char-major-44 capidrv
alias char-major-45 capidrv
After this preparation you can load the capi modules with
capiinit start
modprobe capidrv
and unload them again with
rmmod capidrv
capiinit stop
If you get some error messages when you unload the modules - just ignore them! I have written a little startup script to automate this load/unload procedure:
#!/bin/bash
#
# System startup script for the isdn-capi subsystem

case "$1" in
     start)
        echo -n "Setting up capi-drivers for ISDN subsystem"
        capiinit start
        modprobe capidrv
        ;;

     stop)
        echo -n "Remove capi-drivers for ISDN subsystem"
        rmmod capidrv
        capiinit stop
        ;;
     restart)
        $0 stop
        $0 start
        ;;
     *)
        echo "Usage:$0{start|stop|restart}"
        ;;
esac
exit 0
This script can be copied to /etc/init.d/ or /etc/rc.d respectively and you can use it to load the capi modules automatically at every startup.
If you don't have libtiff installed on your system or your libtiff rpm does not provide the needed header files, you will have to compile it from source and install it before you can go on with hylafax. The libtiff package can be downloaded at www.libtiff.org and everything should work fine with
tar xfz tiff-vX.X.X.tar.gz
cd tiff-vX.X.X
./configure
make
make install
Now you can go on with the installtion of hylafax.
To install hylafax you first need the source code from www.hylafax.org. After
tar xfz hylafax-X.X.X.tar.gz
you must run
cd hylafax-X.X.X
./configure
At the following Questions you should set the spool directory (option 7) to /var/spool/fax and the paper size (option 13) to A4. You can leave the other setting as they are. After that you must install hylafax with
make
make install
faxsetup
Now you have to use faxsetup to make the right the settings for your area code, international code (both without the leading zeros - they go to Long Distance Prefix and Int. Distance Prefix) and so on. IMPORTANT: The last question, the one for
faxaddmodem
has to be answered with NO. After all that you should change the script /etc/init.d/hylafax or /etc/rc.d/hylafax respectively a little. Insert
$ECHO "Starting capifax receive..."
/usr/local/bin/c2faxrecv &
at the end of the start section and
$ECHO "Shutting down capifax receive..."
killall -15 c2faxrecv
at the beginning of the stop section. These changes are usefull to start the faxreceive deamon when hylafax is started.
hylafax was originally made for "real" modems and therefore you have to install the capi4hylafax patch. This patch makes your ISDN card look like a for hylafax. To install the patch you have to get the tarball at www.avm.de and unpack it with
tar xfz capi4hylafax-XX.XX.XX.tar.gz
Now do
cd capi4hylafax-XX.XX.XX
./install
to configure and install the patch. The parameters that have to be set are explained in the following table:
| Outgoinging MSN | This is the number (without area code) that capi4hylafax uses to send a fax. If Supress MSN is not set to 0 the recipient can also see this number on top of his fax. |
| Incoming MSN | This is the number (again without region code) that is used to receive faxes. If you want to use more than one number, seperate them by commas. |
| DDI Parameter | These options are needed for operation at a PBX ISDN point-to-point
line with direct dial-in (DDI). DDIOffset is the number that
precedes, the extension and DDILength is the length of the
extension. At IncomingDDIs you can specify a list of used extensions Example: fax number 123456-78 DDIOffset = 123456, DDILength = 2 |
| FaxNumber | This number will be shown to the recipient. Hylafax cannot handle spaces so you should use the form 00XX.XX.XXXXXXXX. The dots will automatically be replaced with spaces. |
| FaxIdentifier | Here you can enter your name or company name. This entry will also show up on the faxes that you send out. |
| NumberPrefix | This option defines the digit required to access an outside line when operating at a PBX (generally "0"). |
After setting all options as described you should be able to send a fax with
c2faxsend -f TIFF -d [TelNum] [TIFF-File]
and to receive one with
c2faxrecv -f TIFF
Up to this point you will not need hylafax. The above commands are just a basic check to see that the installation works.
Now that everything is installed and should work it's time to restart hylafax (/etc/init.d/hylafax restart or something similar) and try to send a fax to somebody.
sendfax -n -d [TelNum] [Fax-File]
You can use many file formats for the fax-file such as PostScript, PDF or TIFF. When a fax is received c2faxrecv should accept the call and put the fax to /var/spool/fax/recvq as a TIFF file.
According to AVM you can use the capi device drivers with only one passive ISDN card because e.g. the sending of a fax causes a lot of cpu load. For me sending and receiving faxes worked fine even when I did a kernel compile (Pentium-MMX 166 MHz). There have also been some messages from ambitious ISDN users in de.comp.os.unix.linux.isdn that have successfully used two or more passive cards at once. But all this and also the many possibilities besides the standart that hylafax provides are to much for this article.
I know from my own experience that sending faxes over ISDN is not the easiest task - if you don't know where and how to start it can be really annoying. But I hope that I could help some of you to manage the capi chaos.
All those who tried it - happy faxing...
|
|
Webpages maintained by the LinuxFocus Editor team
© Sebastian Bauer, FDL LinuxFocus.org |
Translation information:
|
2003-10-21, generated by lfparser version 2.38