|
|
|
| This document is available in: English Castellano Deutsch Francais Nederlands Russian Turkce |

by Frédéric Raynal <pappy(at)users.sourceforge.net> About the author: Frédéric Raynal
is preparing a thesis in computer science about picture tattoo at the INRIA. He is reading a very good detective novel
which implies Th. Roosevelt in the beginning of the century when he was a police
prefect. The atmosphere is very dark. It's about the enquiry of a group of
persons in order to find a serial killer who injures children. This group is supported
by new technologies (psychology, fingerprint, etc...) to find the solution. This
novel from Caleb Carr, L'ange des ténèbres, paints a surprising picture about the
beginning of the last century.
|

Abstract:
A Network File System (NFS) allows to manage files on several computers
inside a network as if they were on the local hard disk. So, there's no need to
know where the files are physically located in order to access them.
NFS easily allows to share data between several computers. For example, a user logged on a network won't need to log on a specific computer: via NFS, he will access his home directory (we say exported) on the machine he is working at.
But NFS isn't a very efficient protocol and thus very slow over a modem connection. It's designed for a local network and is very flexible. It offers a lot of possibilities for users and administrators.
You'll have to administrate this service with care. Allowing everybody to write data into your net would not really be good policy ;-) Some essential actions may reduce risks.
This article starts with a very short introduction on file
systems. Then we will see the NFS protocol. After that
will go into the less theoretical part and do
a NFS server and a client installation. We will also look at the minimum security
precautions you should take. Then with an example, we will illustrate how to combine NFS, NIS and autofs.
For example, we can consider that every physical media for data (hard disk
for example) is an array of small units holding information: we are talking
about
blocks. Every file system manages these blocks in a different way. For example,
in figure 1 , we try to insert a file that will use two blocks.
On the upper illustration, the file has been put after the last occupied block,
leaving empty spaces at the beginning. In the lower part of the picture
(a different files system), it has been put in the first free location.
Such a policy has influence on how much the disk becomes
fragmented. Some file system automatically avoid fragmentation while
others need to be de-fragmented manually.
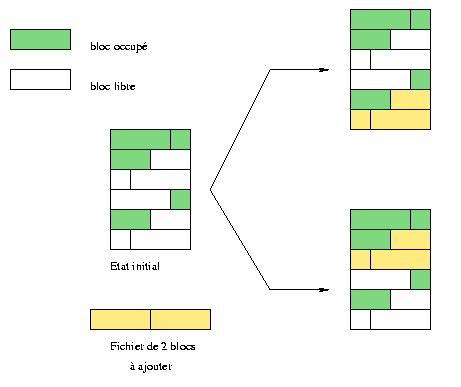
Fig. 1 : 2 different ways to place blocks
The most famous file system on Linux is called ext2fs (extended 2 file system). Every file is represented by an inode1. Directories hold the file list and the device access is done with operations like reading/writing on particular files.
The NFS server's task is to give its clients the inodes they want to
access. However, a client wouldn't work very well only with the file's inode! An NFS server gives an additional net layer allowing remote machines to handle the inodes.
The 4 services allowing NFS to work are:
| Protocol |
|
|
| nfs | This protocol is the base and allows for files creation, searching, reading or writing. This protocol also manages authentication and file statistics. |
|
| mountd | This one is in charge of mounting exported systems in order to access them with nfs. The server receives requests like mount and umount and so must keep information about exported file systems. |
|
| nsm
(Network Status Monitor) |
It's used to monitor network nodes in order to know a machine's state (client or server). It informs, for example, about a reboot. |
|
| nlm
(Network Lock Manager) |
To avoid data modifications by several clients at the same time, this protocol manages a lock system. It knows which files are used. Thus, with the help of the Nsm protocol it is possible to know when a client is restarting. Nsm frees every client's locks before giving them back. |
|
The daemon knfsd, available with latest
kernel versions, directly supports the nfs and nlm protocols. On
the other hand, mountd and nsm are not yet supported. When the NFS server is installed and started, we can verify that everything is working with the command:
>> ps auxwww | egrep "nfs|mount|lock|stat"At the moment, 2 NFS versions are available (versions 2 and 3 - they will be respectively noted NFSv2 and NFSv3 to distinguish them). Linux's NFS servers only supports version 2 (hence the option on the mountd line in the previous example).
root 1370 0.0 0.2 1176 580 ? S 22:28 0:00 rpc.mountd --no-nfs-version 3
root 1379 0.0 0.0 0 0 pts/0 SW 22:28 0:00 [nfsd]
root 1380 0.0 0.0 0 0 pts/0 SW 22:28 0:00 [nfsd]
root 1381 0.0 0.0 0 0 pts/0 SW 22:28 0:00 [nfsd]
root 1382 0.0 0.0 0 0 pts/0 SW 22:28 0:00 [nfsd]
root 1383 0.0 0.0 0 0 pts/0 SW 22:28 0:00 [nfsd]
root 1384 0.0 0.0 0 0 pts/0 SW 22:28 0:00 [nfsd]
root 1385 0.0 0.0 0 0 pts/0 SW 22:28 0:00 [nfsd]
root 1386 0.0 0.0 0 0 pts/0 SW 22:28 0:00 [nfsd]
root 1399 0.0 0.0 0 0 pts/0 SW 22:28 0:00 [lockd]
root 1409 0.0 0.2 1156 560 ? S 22:28 0:00 rpc.statd
root 1652 0.0 0.1 1228 484 pts/3 S 22:49 0:00 egrep nfs|mount|lock|stat
The NFS is about a data structure called a file handle. It's quite an esoteric bit series which allows to identify in a unique way each file system object (such as a file but not only files). It contains for example the file inode but also an entry representing the device where file is located. So we can look at NFS as a file system embedded within a file system.
root >>/usr/sbin/rpcinfo -pThe rpcinfo command shows the RPCs services working on the machine specified as the argument (-p option). We notice that portmap isn't working yet: we start it (most of Linux distributions provide scripts to automate this on startup) and we check that it's working. Another common reason for a negative answer to rpcinfo is that the portmapper is not allowed to answer because of security restrictions in /etc/hosts.{allow, deny} files. In that case add a "portmap: hosts" entry to the hosts.allow file.
rpcinfo: can't contact portmapper: RPC: Remote system error - Connection refused
root >>/sbin/portmap
root >>/usr/sbin/rpcinfo -p
program vers proto port
100000 2 tcp 111 portmapper
100000 2 udp 111 portmapper
Before starting NFS itself, it must be configured. There is only one configuration file and it is called /etc/exports. Each line shows the export location followed by a list of clients allowed to access it. It is possible to add options at the end of each client name. The man exports page explains the syntax for client names and options.
The accepted forms for client names are:
When we modify the /etc/exports configuration file, we must warn the affected daemons that changes have been made. The exportfs command transmits this information to our servers. The -r option synchronizes the /etc/mtab2 file with the /etc/exports file. The -v option shows the exported files systems together with theirs options.
After startup the following files are holding important information:
The mount command allows to access different file systems. It informs the kernel that a new file system is available indicating its type, its device and a mount point. The -t option can be used to specify the type of file system to use. For NFS, we write: -t nfs.
mount has its own options for NFS. For example, the options rsize and wsize can be used to modify the blocks size for reading or writing. You can combine NFS specific options with more general options like intr, noexec or nosuid. The mount man page lists all these options.
Let's assume the machine charly has an NFS server and exports its /usr/local directory. When you want access it from the machine jill, then you just have to mount the exported directory from charly to jill:
root@jill >> mount -t nfs -o nosuid,hard,intr charly:/usr/local /usr/localThe command indicates we are mounting a NFS file system (-t nfs), with the nosuid, hard and intr options. The 2 last arguments are the most interesting. The first one specifies the device to mount. For NFS, the syntax is different from the usual mount command line where you specify device and directory. Here we specify server:exported_directory instead of a device. The last argument indicates the location of the file system on the client side. We just share charly's /usr/local with jill and can avoiding to install programs in /usr/local more than once. To make this set up permanent, we can specify it in the jill /etc/fstab file. fstab contains all the devices to be mounted on start up. The syntax for /etc/fstab is:
# device mount point file system options dump fsckorder
charly:/usr/local /usr/local nfs nosuid,hard,intr 0 0
A client can't blindly trust a server, so we must specify constraining options when using the mount command. We already mentioned the first one: nosuid. It cancels the SUID and SGID bits effect. So, a root person on the server must first login as a user on the client and then become root. Another option, more restrictive, is noexec. It forbids to execute programs on the exported file system. This option is only usable on systems holding data only.
On the NFS server side, we can also specify that we don't trust the client's root account. We have to specify this in /etc/exports with the root_squash option. Then if a user with UID 0 (root) on the client accesses the file system exported by the server, it gets the nobody UID to query files. This option is active by default under Linux but can be canceled with the no_root_squash option. A set of UIDs can be specified to which the the option should apply. Remember also that anonuid and anongid options allow to change user's UID/GID from nobody to different one.
Some actions are more general and effect the portmapper. For example, we forbid the access to all machines with the following line in the /etc/hosts.deny file:
# hosts.deny : absolute prohibition for every one to
# use the portmap
portmap: ALL
Then in the /etc/hosts.allow
file, this strict prohibition is counterbalanced allowing the access to the
desired machines.
Good firewall rules also contribute to a better protection. Watch the ports
used by the different services and the used protocols:
| Service RPC | Port | Protocols |
| portmap | 111 | upd / tcp |
| nfsd | 2049 | udp |
| mountd | variable | udp / tcp |
First, let's see the configuration of our server charly. We start with defining some NIS maps holding all needed information.
The /etc/netgroup file holds machine groups having common characteristics (a same architecture for example). A NIS map is very useful for NFS. We just have to gather all the machines allowed to access the same exported file system. This group is then used in the /etc/exports file instead of specifying all clients one by one:
# /etc/netgroupAs far as NFS is concerned, we know the configuration is quite restricted. The /etc/exports file from charly holds:
charlysangels (sabrina,,) (jill,,) (kelly)
# /etc/exportsWe decide to use automount to access the exported /usr/local directory. Instead of mounting this system at boot time, it's done automatically when a user accesses a file in this directory. We create the /etc/auto.map file to define what will be accessible both by automount and by NIS:
/usr/local @charlysangels(ro)
# /etc/auto.mapSince we want these informations (the new auto.map and netgroup files) to be integrated into the NIS database, we have to modify the Makefile before rebuilding it. We must be sure that netgroup will be added to the base. Concerning auto.map, this file isn't defined by default . We just have to add a new entry in the Makefile, with the associated rule (using the existing one as a model):
charly charly:/usr/local
#To be added in the Yellow Pages Makefile
AUTO_MAP = $(YPSRCDIR)/auto.map
# ...
#...
auto.map: $(AUTO_MAP) $(YPDIR)/Makefile
@echo "Updating $@..."This production rule just removes comments, adds a new entry to the database and then transmits the information to every server.
-@sed -e "/^#/d" -e s/#.*$$// $(AUTO_MAP) | $(DBLOAD) \
-i $(AUTO_MAP) -o $(YPMAPDIR)/$@ - $@
-@$(NOPUSH) || $(YPPUSH) -d $(DOMAIN) $@
We just have to run make from the /var/yp directory.
Now, our three clients sabrina, jill and kelly. Here, there is nothing to do :) We must tell autofs to manage a new map given by YPs. In each client's /etc/auto.master file the following line informs about the presence of a map auto.map obtained via YP's services.
#/etc/auto.masterAfter that we have to restart autofs to make this new map effective.
/usr/local yp auto.map --intr,nosuid,nodev
Now we have a unique /usr/local physical directory on charly. Then, when specific programs are installed on charly, all machines can use them.
This example could go further with the installation of only one /usr system, /usr/doc or others, but the practice shows it isn't a good
idea. Installations often need to modify files in the /etc directory or others. We then should have to modify all
the machines to update non-exported files and that becomes quickly boring.
NFS
|
|
Webpages maintained by the LinuxFocus Editor team
© Frédéric Raynal, FDL LinuxFocus.org Click here to report a fault or send a comment to LinuxFocus |
Translation information:
|
2002-04-28, generated by lfparser version 2.28