| This document is available in: English Castellano Deutsch Francais Turkce |

by Hilaire Fernandes About the author: Hilaire Fernandes is the vice-president of the OFSET, an organization to promote the development of free (as in freedom) education software for the Gnome desktop. He has also written Dr.Geo an award winning interactive geometry software and he is currently busy with Dr.Genius another mathematic education software for the Gnome desktop. Content:
|
Abstract:
This series of articles is especially written for beginner in Gnome programming and GNU/Linux. The chosen development language, Python, avoids the common overload with compiled languages as C. Prior to the reading of this article some knowledge about Python programming is necessary.
To be able to run the program described in this article you will need at least:
To install Pyhton-Gnome and LibGlade from the sources:
./configure make make install |
will do the trick. (More explanation can be found at
[
http://www.linuxgazette.com/issue38/pollman.html ]
You must also check that the Python environment variable
PYTHONPATH is set to the path where the Python-Gnome modules
were installed. This can be
/usr/local/lib/python1.5/site-packages or
/usr/lib/python1.5/site-packages/. In this place you find all the
necessary bindings for Gnome and LibGlade, for example you will find
the libglade.py module there. To set the PYTHONPATH
just add in your .bash_profile:
PYTHONPATH=/usr/local/lib/python1.5/site-packages export PYTHONPATH |
Don't forget, you may have to start your Python code from a terminal to get this variable set.
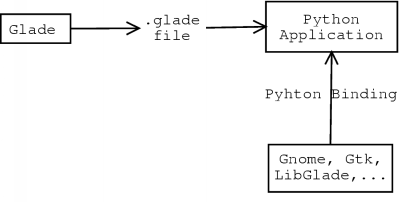
Glade is an interface builder developed by Damon Chaplin. It allows graphical and interactive construction of Gnome/Gtk graphical user interfaces. From Glade, the generated interface can be saved in a xml file or directly exported to C code to be included in a C source tree. Glade also allows to define the name of the handlers - functions - to be attached to the various event of the interface. For example the function (name) to be called when a specific menu item is pressed.
LibGlade is a library written by James Henstridge to generate on the fly an interface represented by a Glade xml file. The application just needs to be aware of the xml file - generally ending by the .glade extension - and then LibGlade can generate the interface from it. James Henstridge has also written the LibGlade Pyhton binding - among others - found in the Gnome-Python package. LibGlade also allows to auto-connect - almost in Python - the handlers defined in the .glade file to functions defined in the Python code.
The following graph shows this general mechanism. To understand how the Pyhton binding is implemented, it's sometimes necessary to look at the Gtk, Gnome, LibGlade Python modules located in PYTHONPATH in order to compare them to the C Gtk/Gnome developer documentation.
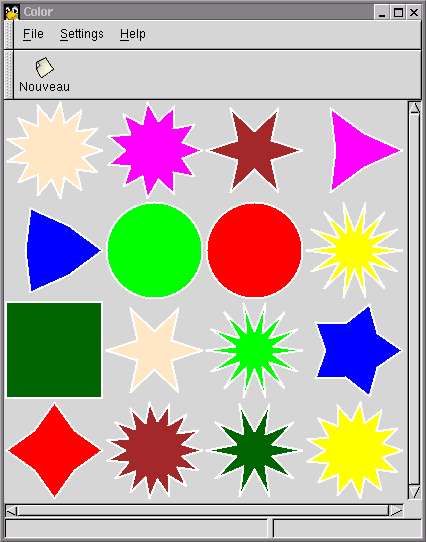
As a first approach to Gnome-Python programming, I propose a simple color game where kids have to recognize shapes of the same color. This example is very graphic oriented and presents nice features of Gnome such as the Gnome Canvas and the Gnome Application Window. The rules of this game are quite simple: the game board is filled with 16 shapes - circles, stars and squares - of different colors. All this 16 shapes are divided in 8 pairs of identical color. To finish the game, just select successively these 8 pairs. You might want to look first at the code at the end of this document to get an overall idea and then resume from here.
The widgets
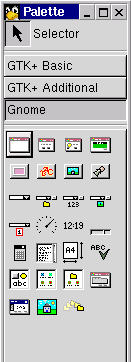 After starting Glade,
you will get two windows. One is a widget tool box, called
Palette. Form this one you can select the categories of widget
among GTK+ Basic, GTK+ Additional and
Gnome. If you don't have the Gnome widget, Glade may have been
compiled without Gnome support. Check the configure of the
source Glade package, configure --help explains the
configuration options.
After starting Glade,
you will get two windows. One is a widget tool box, called
Palette. Form this one you can select the categories of widget
among GTK+ Basic, GTK+ Additional and
Gnome. If you don't have the Gnome widget, Glade may have been
compiled without Gnome support. Check the configure of the
source Glade package, configure --help explains the
configuration options.
The other window lists in its main area the created widgets.
With Glade, we first create a Gnome Application Window. This widget is a window with menu bar & tool bar. Both are packed on the handled dock. On the bottom of the Gnome Application Window there is also already packed a status bar. After creating a Gnome Application Window, open the Widget Tree dialog (you will find it in the view menu in Glade). Now you can explore what is exactly packed in this widget.
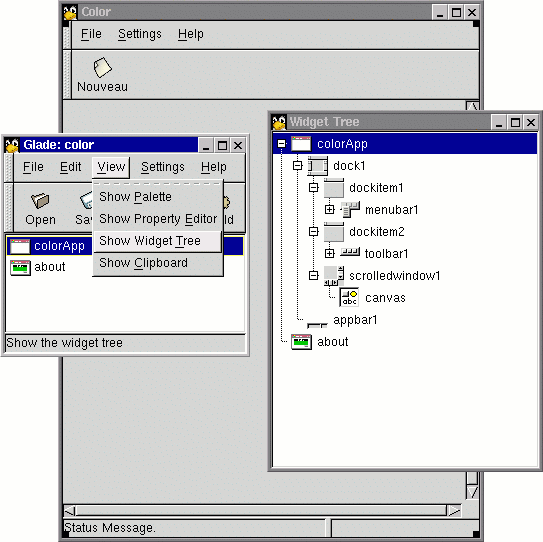
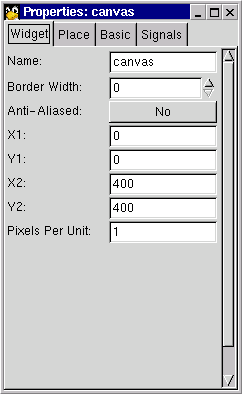
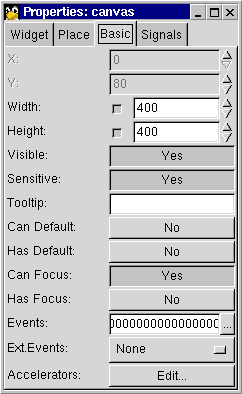
Next add a canvas in the main area of the Gnome application widget. From the properties dialog, set its maximal coordinates to 400 and its maximal height and width to 400.
And now create a Gnome About Dialog. You can adjust its content from the properties dialog in the Widget sheet.
All these widgets are in the Gnome category of the Palette.
Now remove the unused icon buttons and menu items. In the tool bar remove the Open and Save icon buttons. Next edit the menu bar (right click over it and choose edit menu) and remove all menus and menu items except for File->New, File->Exit, Setting->Preferences and Help->About.
Setting the widget and handler names
Apply the following names to these widgets so we can use them with theses names in Python:
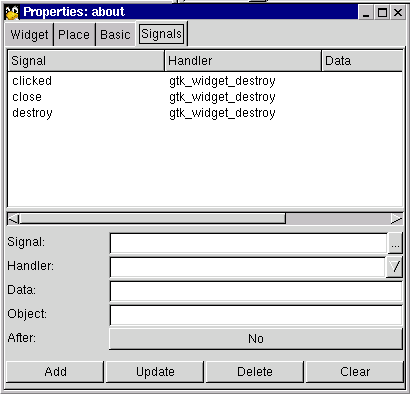
The handler names are function names to be called when an event occurs on a particular widget. This means, we will define functions in Python using these names - almost as you will see later. For example when the user clicks on the new icon button we want to call a function to reset the game. To set this up from Glade, you first need to select the widget, then adjust from the Signals sheet in the properties dialog.
In our example, the signal is clicked and the handler is the function name. The following arrays present all the used signal and handler:
In the about dialog:
| Widget name | Signal | Handler |
|---|---|---|
| about | clicked | gtk_widget_destroy |
| about | close | gtk_widget_destroy |
| about | destroy | gtk_widget_destroy |
The gtk_widget_destroy handler is predefined in GTK. It just destroys the widget.
In the colorApp window. First, Glade automatically chooses the signals/handlers for items menu. You can check their names. I append them at the end of this array. You will note that both new menu item and the new icon button share the same handler, normal they have similar purposes:
| Widget name | Signal | Handler |
|---|---|---|
| button1 (new icon button on the toolbar |
clicked | on_new_activate |
| new | activate | on_new_activate |
| colorApp | destroy | on_exit1_activate |
| exit1 | activate | on_exit1_activate |
| about1 | activate | on_about_activate |
The final touch
Call the Project Options from the Options button in the Glade toolbar. In the General sheet, adjust the project entries as below:
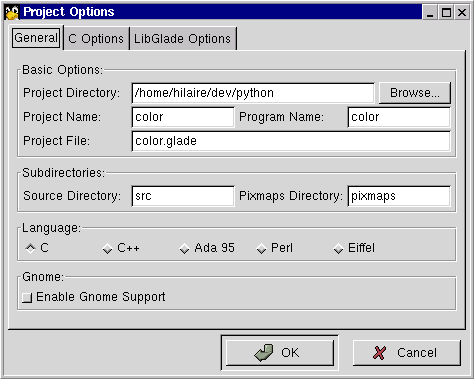
The file representing the widgets is color.glade. Adjust the path to your own home directory.
Now save the file from the File menu. Do not build
source code, we don't use that feature.
We have now finish with Glade and we can now start with
Python.
The complete code is at the end of this document. It must be saved in the same location of the color.glade file.
from math import cos, sin, pi from whrandom import randint from gtk import * from gnome.ui import * from GDK import * from libglade import * |
From the modules math and whrandom, we include non Gnome specific functions as cos, sin, randint as well the pi constant. The gnome specific modules are gtk, GDK and gnome.ui. In C, including the gnome.h includes all the Gnome headers. In Pyhton, you first need to figure out in which module the binding for the Gnome function that you want to use is located . For example, you can search from a terminal window (shell) for the module containing the string "canvas" with the following command:
cd /usr/local/lib/python1.5/site-packages/gnome grep canvas *.py |
The above assumes that the Gnome binding was installed in /usr/local/lib/python1.5/site-packages.
In this Python example, we use the Gnome Canvas to manipulate shapes - actually stars, circles and squares. A canvas is a placeholder for graphic items (ellipse, point, line, rectangle), text items and even widgets. In fact, a canvas can contain several canvas groups. Finally, in a canvas group one can place canvas items - our shapes. By default a canvas contains one default canvas group, called root canvas group, we will use this one to place our shapes.
First, some global variables are defined:
The first function to be called - initColor - builds the widgets from the color.glade file and auto-connects the handlers to the widgets:
def initColor ():
    global rootGroup, canvas
    wTree = GladeXML ("color.glade",
                      "colorApp")
    dic = {"on_about_activate": on_about_activate,
           "on_exit1_activate": mainquit,
           "on_new_activate":on_new_activate}
    wTree.signal_autoconnect (dic)
    canvas = wTree.get_widget ("canvas")
    rootGroup = canvas.root ()
|
Building the widget is done with the GladeXML function. Of course you need to adjust the path to the color.glade file. This function builds up and shows up the colorApp Gnome Application Window we defined with Glade. It returns an object - really a class - with useful methods.
Next we connect the handlers we have defined in Python - more on
that latter - to the widgets defined in the color.glade
file. For that, we need to build a dictionary which holds keys for the
handler names defined in the color.glade file:
on_about_activate, on_exit1_activate and
on_new_activate. The associated values to this keys are the
function names defined in Python.
Finally, the signal_autoconnect method does the rest of the
job for us.
Last we fetch the reference of the canvas constructed during the GladeXML call - a GnomeCanvas object in Python - and the root canvas group - a GnomeCanvasGroup object.
Useful tips
There is no actual reference manual covering the Gnome binding for Python. However there is a lot of documentation about Gnome programming in C available from the Gnome web site. Looking at this documentation can be useful but you will also need to look a bit inside the Gnome binding for Python to exploit it:
The binding is located at /usr/local/lib/python1.5/site-packages/gnome/ or /usr/lib/python1.5/site-packages/gnome/
Looking in the binding shows several things:
For each Gnome use in Python we can do the same to get the related documentation. I let you read the related Gnome documentation to learn more about these functions.
There are three handlers to auto-connect to the GUI. There are on_about_activate, on_new_activate and mainquit. The last one is in fact a Python function to stop and exit from Python.
def on_about_activate(obj):
    "display the about dialog"
    about = GladeXML ("color.glade", "about").get_widget ("about")
    about.show ()
|
This handler opens the about dialog. We first fetch a reference of the about dialog - in fact LibGlade build it through the GladeXML object. Remember GladeXML is a Python object with a method - among other - called get_widget. This method returns a GtkWidget object which contains the show method.
Tips
Look for the GtkWidget object in the gtk.py binding. You can see that this object has a show method. The previous handler body can be written as: GladeXML("color.glade","about").get_widget("about").show().
def on_new_activate (obj):
    global rootGroup, colorShape
    for item in colorShape:
        item.destroy ()
    del colorShape[0:]
    buildGameArea (rootGroup)
|
This handler rebuilds a new game area. The existing shapes are first destroyed. The shapes are GnomeCanvasItem objects derived from GtkObject objects. The destroy method is located in GtkObject object. Next a new game area is built.
Defining the shape
The buildGameArea function coordinates the creation of the game area in the GnomeCanvasGroup group. The shapes - GnomeCanvasItem - are built from calls to the buildShape function. The shapes can be circle, square or star.
The shape creation is done with the following code, depending on the created shape:
item = group.add ("ellipse", x1 = x - r, y1 = y - r,
                  x2 = x + r, y2 = y + r, fill_color = color,
                  outline_color = "black", width_units = 2.5)

[...]

item = group.add ("rect", x1 = x - a, y1 = y - a,
                  x2 = x + a, y2 = y + a, fill_color = color,
                  outline_color = "black", width_units = 2.5)

[...]

item = group.add ("polygon", points = pts, fill_color = color,
                  outline_color = "black", width_units = 2.5)
|
The variable group holds a reference to a GnomeCanvasGroup object. If we look in the ui.py binding, the GnomeCanvasGroup has an add method. Its first argument, tp expects a string containing the item type to add. Its next arguments are pairs of keyword arguments and values, they are matched against a dictionary. To get the full list of available keywords, look in the GnomeCanvasRect, GnomeCanvasEllipse and GnomeCanvasPolygon objects in ui.py.
The ellipse and rectangle are quite similar, the two abscissa and ordinate coordinates define two opposite top points of their bounding box, respectively top-left and bottom-right. The origin of the canvas is by default located at the top-left of the canvas. The polygon expects as value of the points keyword, a list of pair coordinates defining the points of the polygon. The other arguments are quite evident to understand.
Attaching the event to the shape
Now, we connect an event to each shape we create. This is done at the end of the buildShape function:
item.connect ('event', shapeEvent)
colorShape.append (item)
|
We just use the connect method of the GtkObject which is an ancestor object of GnomeCanvasItem. Its first argument is the signal. As GnomeCanvasItem has a single signal event to cover all types of event, we just set it to event. The second argument is the handler name we wrote, here shapeEvent. Eventually we can pass data in a third argument, but we don't need. That's all!
Now the creation of the handler for the shapes:
def shapeEvent (item, event):
    global selectedItem, itemToSelect, colorShape
    if event.type == ENTER_NOTIFY and selectedItem != item:
        #highligh outline
        item.set(outline_color = 'white')
    elif event.type == LEAVE_NOTIFY and selectedItem != item:
        #unlight outline
        item.set(outline_color = 'black')
    elif event.type == BUTTON_PRESS:
        #select the item
        if not selectedItem:
            item.set (outline_color = 'white')
            selectedItem = item
        elif item['fill_color_gdk'] == selectedItem['fill_color_gdk'] \
             and item != selectedItem:
            #destroy both item
            item.destroy ()
            selectedItem.destroy ()
            colorShape.remove (item)
            colorShape.remove (selectedItem)
            selectedItem, itemToSelect = None, itemToSelect - 1
            if itemToSelect == 0:
                buildGameArea (rootGroup)
    return 1
|
When this handler is called, the item variable contains a reference to the shape where an event occurs, and event contains the event. In the GdkEvent event we are only interested by three types of event:
I've left out all Python code not relevant for Gnome, it should not be that difficult to understand it. My main objective in this simple tutorial was to show you how to figure out by yourself how the things work: looking in the Gnome binding for Python or the Gnome C header and reading the Gnome documentation for C programming. Of course, I also show how easy and powerful is the Gnome Canvas and Glade/LibGlade are. From now on, there is a lot you can do by extending this code. (The source files for this article can be found here)
#!/usr/bin/python
# Couleur - Teo Serie
# Copyright Hilaire Fernandes 2000
# Release under the terms of the GPL licence version 2
# You can get a copy of the license at http://www.gnu.org
#
# Select shapes with same color
#
from math import cos, sin, pi
from whrandom import randint
from gtk import *
from gnome.ui import *
from GDK import *
from libglade import *

width, itemToSelect = 400, 8
selectedItem = rootGroup = canvas = None
# to keep trace of the canvas item
colorShape =[];

def on_about_activate(obj):
    "display the about dialog"
    about = GladeXML ("color.glade", "about").get_widget ("about")
    about.show ()

def on_new_activate (obj):
    global rootGroup, colorShape
    for item in colorShape:
        item.destroy ()
    del colorShape[0:]
    buildGameArea (rootGroup)

def shapeEvent (item, event):
    global selectedItem, itemToSelect, colorShape
    if event.type == ENTER_NOTIFY and selectedItem != item:
        #highligh outline
        item.set(outline_color = 'white')
    elif event.type == LEAVE_NOTIFY and selectedItem != item:
        #unlight outline
        item.set(outline_color = 'black')
    elif event.type == BUTTON_PRESS:
        #select the item
        if not selectedItem:
            item.set (outline_color = 'white')
            selectedItem = item
        elif item['fill_color_gdk'] == selectedItem['fill_color_gdk'] \
             and item != selectedItem:
            #destroy both item
            item.destroy ()
            selectedItem.destroy ()
            colorShape.remove (item)
            colorShape.remove (selectedItem)
            selectedItem, itemToSelect = None, itemToSelect - 1
            if itemToSelect == 0:
                buildGameArea (rootGroup)
    return 1

def buildShape (group, number, type, color):
    "build a shape of 'type' and 'color'"
    global colorShape
    w = width / 4
    x, y, r = (number % 4) * w + w / 2, (number / 4) * w + w / 2, w / 2 - 2
    if type == 'circle':
        item = buildCircle (group, x, y, r, color)
    elif type == 'squarre':
        item = buildSquare (group, x, y, r, color)
    elif type == 'star':
        item = buildStar (group, x, y, r, 0.4, randint (3, 15), color)
    elif type == 'star2':
        item = buildStar (group, x, y, r, 0.6, randint (3, 15), color)
    item.connect ('event', shapeEvent)
    colorShape.append (item)

def buildCircle (group, x, y, r, color):
    item = group.add ("ellipse", x1 = x - r, y1 = y - r,
                      x2 = x + r, y2 = y + r, fill_color = color,
                      outline_color = "black", width_units = 2.5)
    return item

def buildSquare (group, x, y, a, color):
    item = group.add ("rect", x1 = x - a, y1 = y - a,
                      x2 = x + a, y2 = y + a, fill_color = color,
                      outline_color = "black", width_units = 2.5)
    return item

def buildStar (group, x, y, r, k, n, color):
    "k: factor to get the internal radius"
    "n: number of branch"
    angleCenter = 2 * pi / n
    pts = []
    for i in range (n):
        #external points of the star
        pts.append (x + r * cos (i * angleCenter))
        pts.append (y + r * sin (i * angleCenter))
        #internal points of the star
        pts.append (x + r * k * cos (i * angleCenter + angleCenter / 2))
        pts.append (y + r * k * sin (i * angleCenter + angleCenter / 2))
    pts.append (pts[0])
    pts.append (pts[1])
    item = group.add ("polygon", points = pts, fill_color = color,
                      outline_color = "black", width_units = 2.5)
    return item

def getEmptyCell (l, n):
    "get the n-th non null element of l"
    length, i = len (l), 0
    while i < length:
        if l[i] == 0:
            n = n - 1
        if n < 0:
            return i
        i = i + 1
    return i

def buildGameArea (group):
    global itemToSelect, selectedItem
    itemColor = ['red', 'yellow', 'green', 'brown', 'blue', 'magenta',
                 'darkgreen', 'bisque1']
    itemShape = ['circle', 'squarre', 'star', 'star2']
    emptyCell = [0,0,0,0,0,0,0,0,0,0,0,0,0,0,0,0]
    itemToSelect, i, selectedItem = 8, 15, None
    for color in itemColor:
        # two items of same color
        n = 2
        while n > 0:
            cellRandom = randint (0, i)
            cellNumber = getEmptyCell (emptyCell, cellRandom)
            emptyCell[cellNumber] = 1
            buildShape (group, cellNumber, itemShape[randint (0, 3)], color)
            i, n = i - 1, n - 1

def initColor ():
    global rootGroup, canvas
    wTree = GladeXML ("color.glade",
                      "colorApp")
    dic = {"on_about_activate": on_about_activate,
           "on_exit1_activate": mainquit,
           "on_new_activate":on_new_activate}
    wTree.signal_autoconnect (dic)
    canvas = wTree.get_widget ("canvas")
    rootGroup = canvas.root ()

initColor ()
buildGameArea (rootGroup)
mainloop ()
|
|
|
Webpages maintained by the LinuxFocus Editor team
© Hilaire Fernandes, FDL LinuxFocus.org Click here to report a fault or send a comment to LinuxFocus |
2001-01-27, generated by lfparser version 2.8